Marx Generator

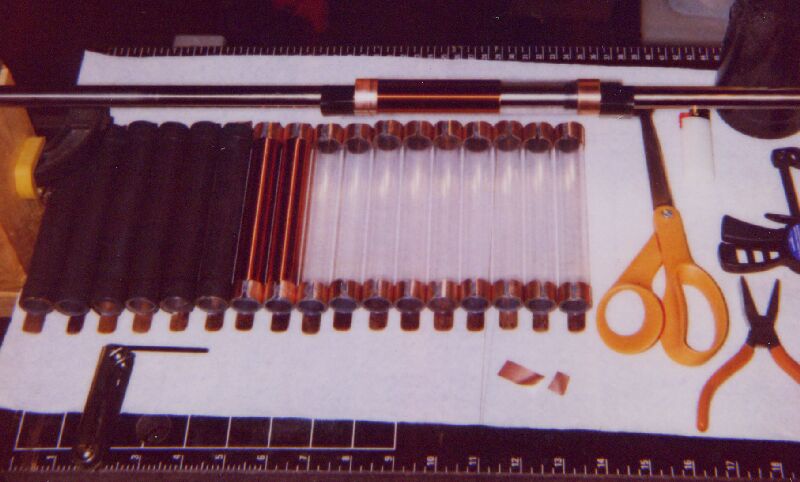
This is a picture of the inductor forms being assembled prior to winding.
The forms start with a 5 1/2" length of 3/4" OD polycarbonate tubing.
The end terminals were cut from 3/4" copper water pipe (actually a bit
more than 3/4" inside diameter) with a corundum cut-off wheel on a Dremel
moto-tool (several worn down wheels are shown above the leftover pipe,
along with a fresh wheel for comparison). I also cut a 1/4" slice
out of the ring portion of each terminal (so that it could be collapsed
onto the plastic tubing). All of the sharp edges on the terminals
were filed off and then polished with a 3M "super fine" sanding pad.
Next, I annealed the terminals by taking them to red heat with a propane
torch (water pipe comes with a hard temper, I could not get the terminals
to adhere to the tubes until I annealed them) and letting them air cool.
The four terminals at the top left of the picture are as cut from the tubing
and still have a thick burr from the tubing cutter. The next four
have been filed and polished. Next, are four that have been slotted
and the last four have been annealed, but not cleaned up (with the sanding
pad) yet. Final assembly involves roughening the ends of the plastic
tubes with a file, cleaning both the tubes and the terminals with isopropanol,
coating the inside of the terminal with epoxy (90 minute pot life), using
a nylon hose clamp to position the terminals on the tubes and letting them
set for a day or two.
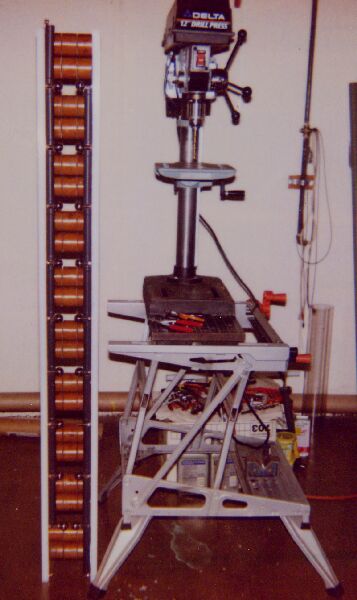
The next step is to wind the forms with 30 awg magnet wire. I
originally tried to solder the wire to the copper terminals, but this caused
the epoxy to fail. My solution was to use two pieces of adhesive
backed copper foil on each terminal. A short piece of foil was placed
over the stripped end of the wire and burnished onto the terminal, then
the end of the wire is bent back over the foil and the larger piece of
tape is burnished down over all. The wire was stripped by heating
it to red heat with the propane torch (the bottom of the torch is just
visible in the upper right of the photo) and then polishing off the black
copper oxide with a sanding pad. After winding, the inductor was
sealed in a piece of polyolefin heat-shrink tubing. Measurement of
the inductors with my LCR meter showed inductances between 450 and 460
microHenrys.
This is a picture of my almost finished, 10 stage, Marx Generator (I
still need to make a base for it). The vertical supports are 5' X
4" X 3/4" ultra high molecular weight polyethylene boards. Each board
was drilled and tapped to accept ten 1.5" lengths of 1/4-20 threaded stainless
steel rod. The rods hold the inductors and steel balls which make
up the spark gaps. The boards are separated by the 20 stacks of three
door-knob capacitors. One board was tapped with twenty 1/4-20 holes,
which accept the 1/4-20 studs on one side of the capacitor stacks.
The other board was drilled with twenty 1/4" holes which accept twenty
1" X 1/4" nylon machine screws which hold the threaded boss on the other
side of the capacitor stacks.
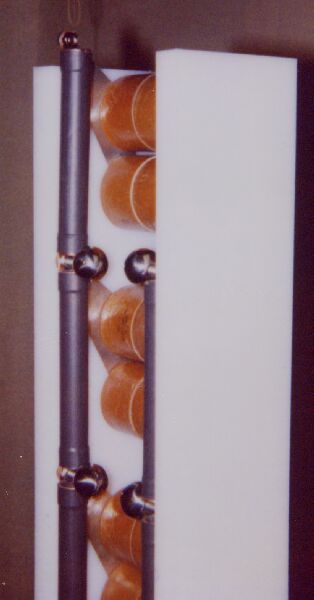
This is a close up of the top stages of my Marx generator. Here
you can see part of the aluminum straps which electrically connect the
capacitors to the inductors and spark gaps. For each stage of the
generator, two stacks of three capacitors are connected together, giving
a stage capacitance of ~1200 picoFarads. The individual gaps are
adjustable from ~3/8" to ~1 1/8".
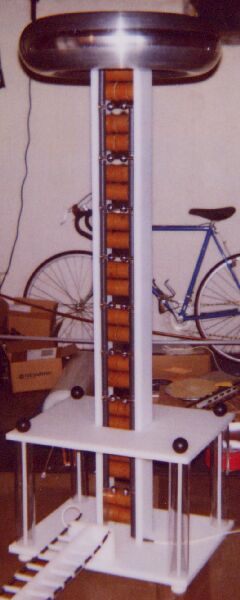
10/28/01: Here is a picture of the generator mounted in a base
made from two 3/4" thick 16" X 20" HDPE boards separated by four 14" lengths
of 2.5" OD polycarbonate tubing all held together with 12"-13 threaded
fiberglass rod, delrin swivel feet and plastic ball knobs. I have
also added my Tesla coil toroid to the top, to help cut down on corona
losses.
Back to Marx